

How to fail over and reinstate Oracle Database in the cloud.
Note: To use the procedure presented in this article, you need two Oracle Cloud database instances. Also, the procedure presented was performed on Oracle Database 11g; however, the procedure should work on later releases such as Oracle Database 12c Release 1 and Release 2.
Create the Primary Database Instance
- Log in to your Oracle Cloud services account. Then go to the Oracle Database Cloud Service page and create a new service:- For Service Name enter
Primary.
– From the Service Level list, select Oracle Database Cloud Service.
– From the Metering Frequency list, select whatever frequency is appropriate for your environment.
– From the Software Release list, select Oracle Database 11g Release 2.
– From the Software Edition list, select Enterprise Edition.
– From the Database Type list, select Single Instance.Then click Next to continue.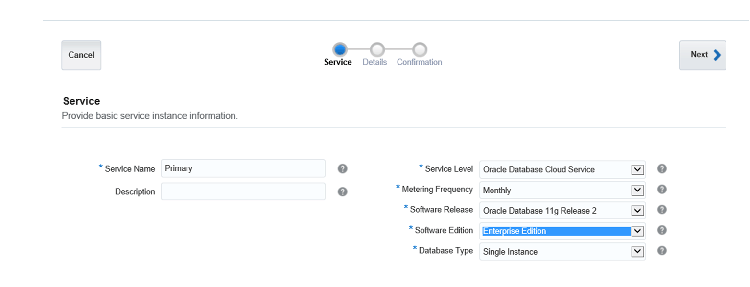
Figure 1. Creating a new service
- In the Service Details screen, do the following:- For DB Name (SID), enter
ORCL.
– Set an administrative password of your choice and confirm the password (this will be your sys password).
– For Usable Database Storage (GB), enter25.
– From the Compute Shape list, select OC3 -1 OCPU, 7.5GB RAM (this is the bare minimum required).
– For SSH Public Key, enterrsa-key-20170111.pub.Then click Next to continue.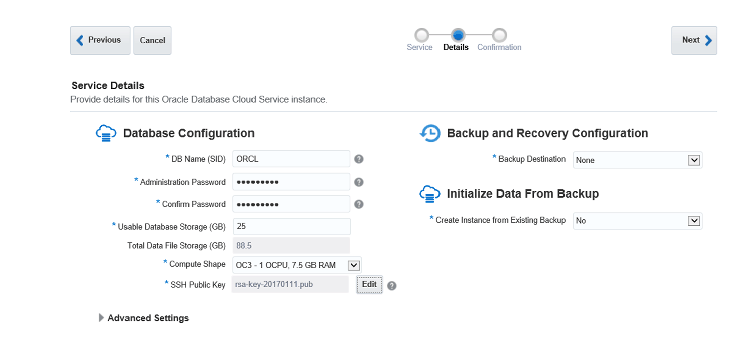
Figure 2. Specifying the service details
- Finally, review the configuration and click Create to create your primary cloud database.
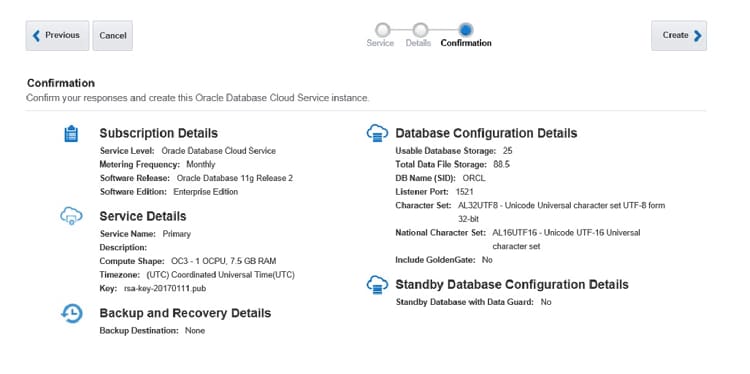
Figure 3. Creating the primary cloud database instance
After a few minutes, the primary cloud database instance has been created successfully.
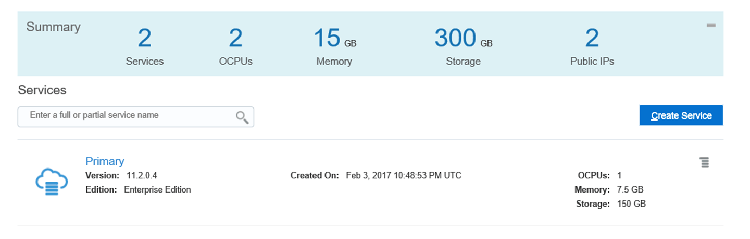
Figure 4. The primary database has been created
- Click the service name (Primary) to open the main page of the database.
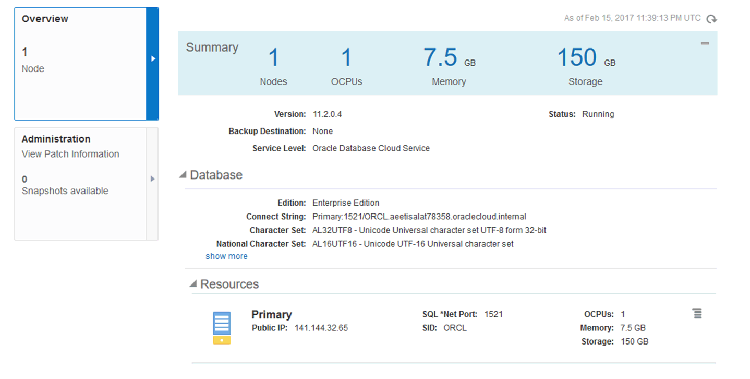
Figure 5. Main page of the primary database
- Before trying to connect to the primary database instance on the cloud machine, you have to enable the dblistener access rule. Do the following:a. Open the database service and select Access Rules from the menu.
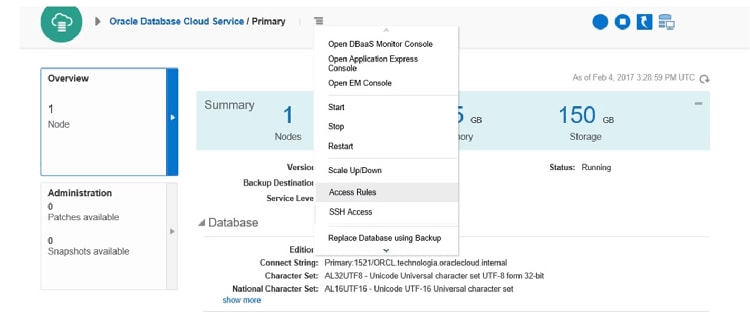
Figure 6. Selecting the Access Rules item
b. For the ora_p2_dblistener rule, select Enable from the Actions menu.

Figure 7. Enabling the ora_p2_dblistener rule
Create the Standby Database Instance
- Log in to your Oracle Cloud services account. Then go to the Oracle Database Cloud Service page and create a new service:- For Service Name enter
Standby.
– From the Service Level list, select Oracle Database Cloud Service.
– From the Metering Frequency list, select whatever frequency is appropriate for your environment.
– From the Software Release list, select Oracle Database 11g Release 2.
– From the Software Edition list, select Enterprise Edition.
– From the Database Type list, select Single Instance.Then click Next to continue.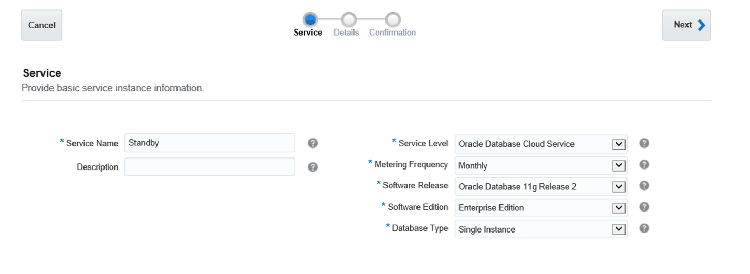
Figure 8. Creating another new service
- In the Service Details screen, do the following:- For DB Name (SID), enter
ORCL.
– Set an administrative password of your choice and confirm the password (this will be your sys password).
– For Usable Database Storage (GB), enter25.
– From the Compute Shape list, select OC3 -1 OCPU, 7.5GB RAM (this is the bare minimum required).
– For SSH Public Key, enterrsa-key-20170111.pub.Click Next to continue.Note: This dummy database will be dropped later.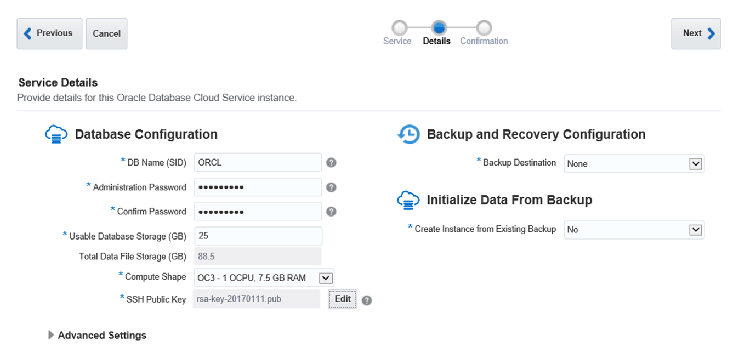
Figure 9. Specifying the service details
- Finally, check the configuration and click Create to create your standby cloud database.
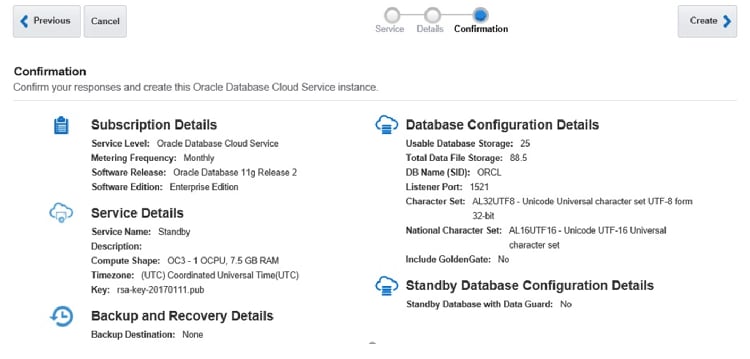
Figure 10. Creating the standby cloud database instance
After a few minutes, the standby cloud database instance has been created successfully.
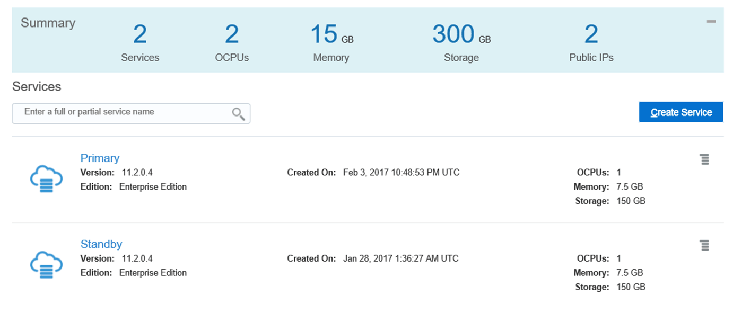
Figure 11. The standby database has been created
- Click the service name (Standby) to open the main page of the database.
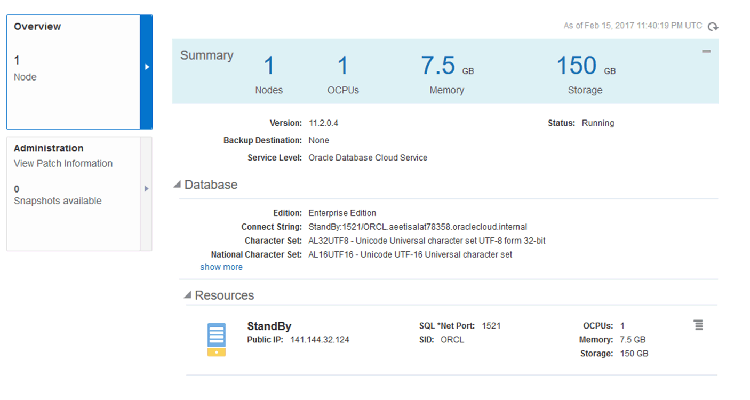
Figure 12. Main page of the standby database
- Before trying to connect to the standby instance on the cloud machine, you have to enable the dblistener access rule. Do the following:a. Open the database service and select Access Rules from the menu.
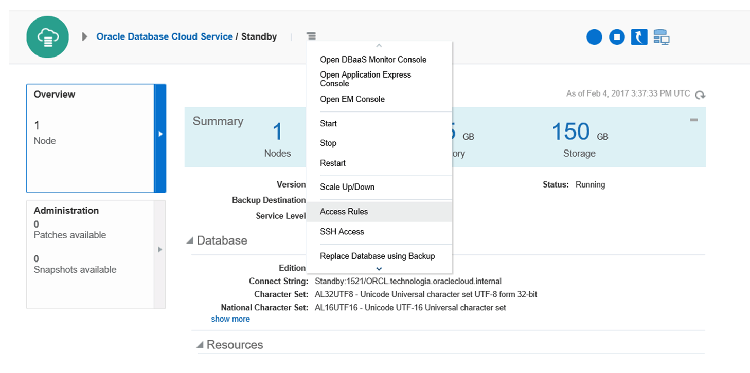
Figure 13. Selecting the Access Rules item
b. For the ora_p2_dblistener rule, select Enable from the Actions menu.
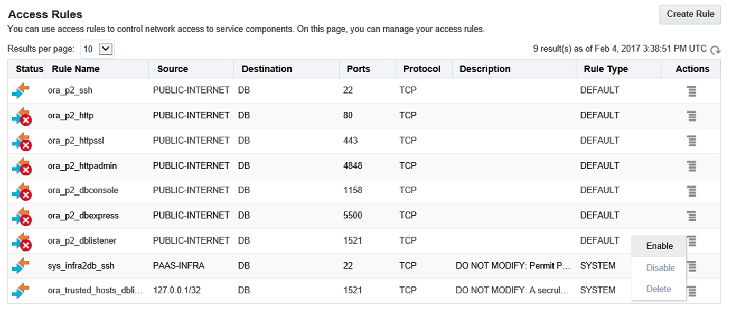
Figure 14. Enabling the ora_p2_dblistener rule
- Open two different instances of the PuTTY executable and connect to both the machines using SSH.
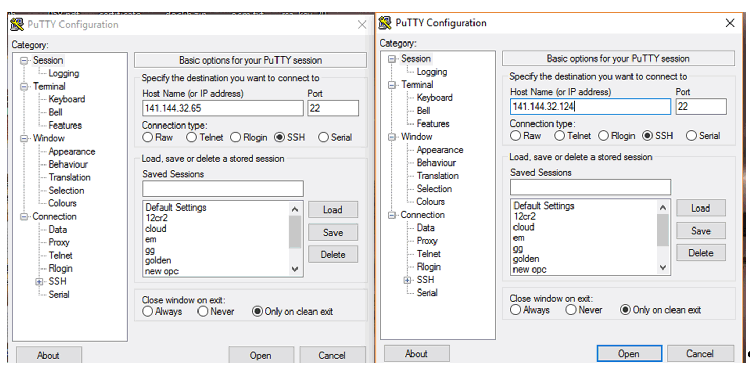
Figure 15. Connecting to both machines using PuTTY
Note: In the following figures, the primary instance is shown with a black background and the standby instance is shown with a yellow background.
- Check the host name and the
pmonprocess on each server.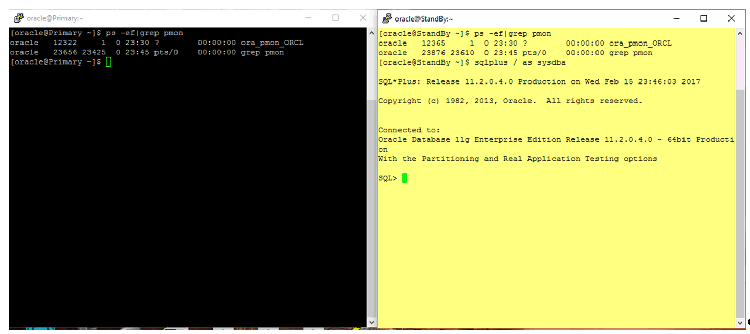
Figure 16. Checking the host names and
pmonprocesses - Drop the default standby database.
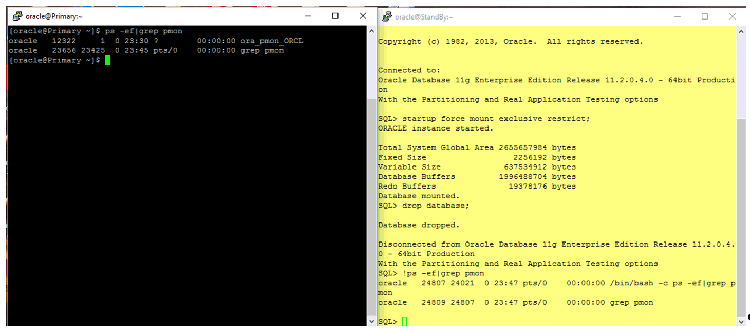
Figure 17. Dropping the standby database
In the next steps, you will re-create the standby database manually.
- Configure the static registration of the standby instance in the
listener.orafile.Also, because you’ll need to configure the Data Guard broker in an upcoming step, add a static entry for its command-line interface (DGMGRL) in thelistener.orafile on both the primary and standby servers. (The Data Guard broker is a distributed management framework provided by Oracle Database, Enterprise Edition.)SID_LIST_LISTENER = (SID_LIST = (SID_DESC = (GLOBAL_DBNAME = STBY_DGMGRL) (ORACLE_HOME = /u01/app/oracle/product/11.2.0/dbhome_1) (SID_NAME = STBY) ) (SID_LIST = (SID_DESC = (GLOBAL_DBNAME = STBY) (ORACLE_HOME = /u01/app/oracle/product/11.2.0/dbhome_1) (SID_NAME = STBY) ) ) LISTENER = (DESCRIPTION_LIST = (DESCRIPTION = (ADDRESS = (PROTOCOL = TCP)(HOST = Standby.compute-aeetisalat78358.oraclecloud.internal)(PORT = 1521)) (ADDRESS = (PROTOCOL = IPC)(KEY = EXTPROC1521)) ) )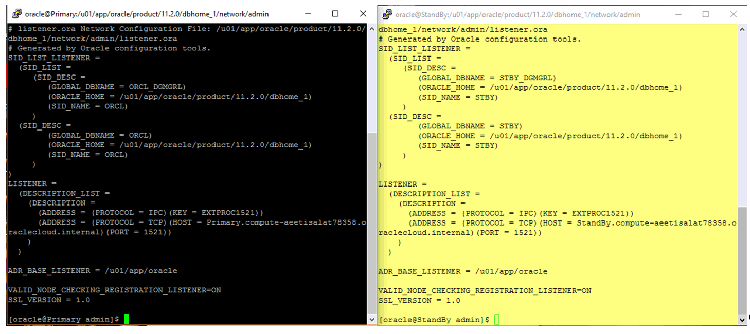
Figure 18. Configuring the
listener.orafiles - Now, restart the listener.
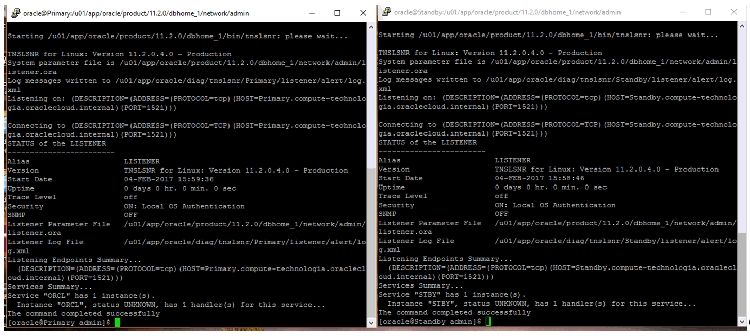
Figure 19. Restarting the listener
- Configure the
tnsnames.orafiles with the public IP addresses of the primary and standby servers. Once the addresses are configured, they can be seen on the console.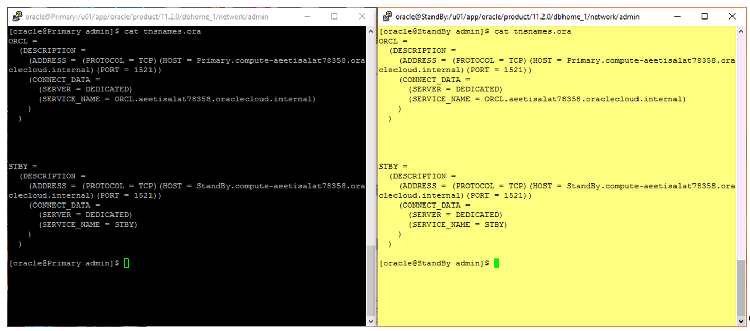
Figure 20. Verifying the configuration of the
tnsnames.ora files - Make sure the
tnspingcommand works on both sides.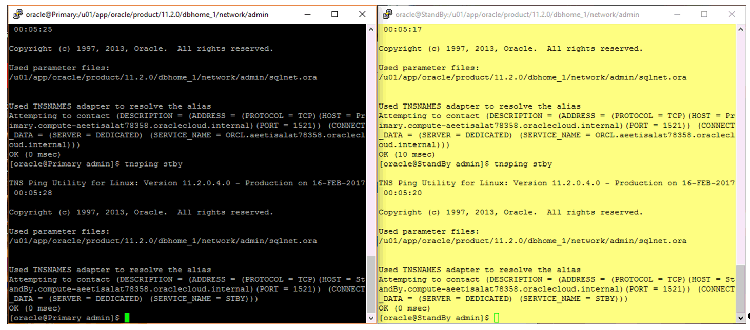
Figure 21. Running the
tnspingcommand - Create the pfile and password file on the standby machine. Also, create the necessary directories for the standby database.
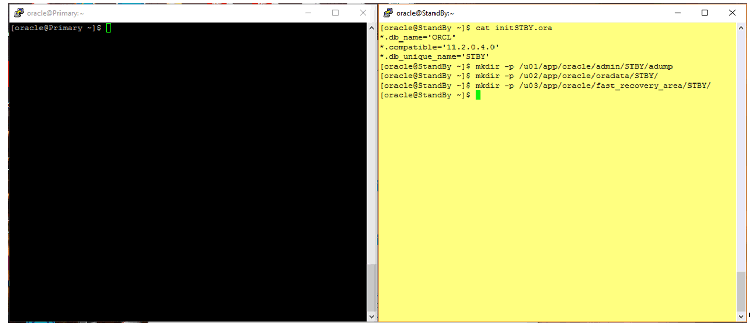
Figure 22. Creating directories on the standby machine
- On the primary machine, set up the following parameters for creating the standby database:
ALTER SYSTEM SET LOG_ARCHIVE_CONFIG = 'DG_CONFIG=(ORCL,STBY)'SCOPE=BOTH; ALTER SYSTEM SET LOG_ARCHIVE_DEST_1='LOCATION=/u01/app/oracle/archive VALID_FOR=(ONLINE_LOGFILES, ALL_ROLES)DB_UNIQUE_NAME=ORCL'; ALTER SYSTEM SET LOG_ARCHIVE_DEST_2='SERVICE=STBY LGWR ASYNC AFFIRM VALID_FOR=(ONLINE_LOGFILES, PRIMARY_ROLE) DB_UNIQUE_NAME=STBY'; ALTER SYSTEM SET FAL_SERVER =STBY SCOPE=BOTH; ALTER SYSTEM SET STANDBY_FILE_MANAGEMENT = AUTO SCOPE = BOTH; ALTER DATABASE FORCE LOGGING; - Start the standby database using the
nomountoption with thepfileclause. Then from the primary machine, use the Oracle Recovery Manager (Oracle RMAN)rman targetcommand to check both connections.
Figure 23. Starting the standby database and checking the connections
- From the primary machine, use the Oracle RMAN
duplicatecommand to configure the standby database instance.DUPLICATE TARGET DATABASE FOR STANDBY FROM ACTIVE DATABASEDORECOVER SPFILE set control_files='/u02/app/oracle/oradata/STBY/control01.ctl','/u03/app/oracle/fast_recovery_area/STBY/control02.ctl' SET db_unique_name='STBY' COMMENT 'Is standby' SET LOG_ARCHIVE_DEST_2='SERVICE=ORCLASYNC VALID_FOR=(ONLINE_LOGFILES,PRIMARY_ROLE)DB_UNIQUE_NAME=ORCL' SET FAL_SERVER='ORCL' COMMENT 'Is primary' set db_recovery_file_dest='/u01/app/' set db_file_name_convert='/ORCL/','/STBY/' set log_file_name_convert='/ORCL/','/STBY/' NOFILENAMECHECK;After some time, the standby database is created and running in the mounted state.
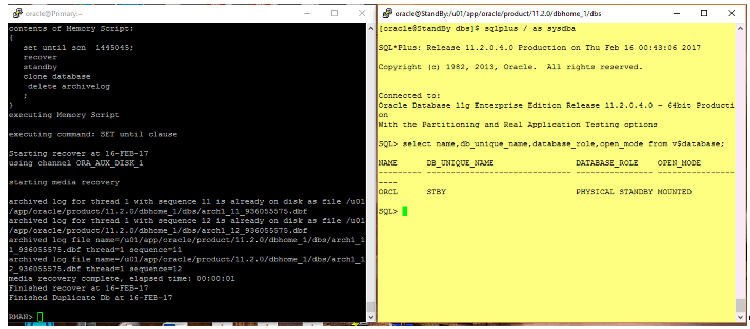
Figure 24. Standby database running in the mounted state
- Now, open the standby database in read-only mode and start the recovery. Also verify that the physical database is functional.On the primary:
create table test as select * from dict;On the standby:
alter database open;

ALTER SYSTEM SET LOG_ARCHIVE_DEST_1='LOCATION=/u01/app/oracle/archive
VALID_FOR=(ALL_LOGFILES,ALL_ROLES) DB_UNIQUE_NAME=STBY';

ALTER SYSTEM SET LOG_ARCHIVE_DEST_2= 'SERVICE=ORCL LGWR ASYNC AFFIRM
VALID_FOR=(ONLINE_LOGFILES, PRIMARY_ROLE) DB_UNIQUE_NAME=ORCL' scope=both;
recover managed standby database using current logfile disconnect;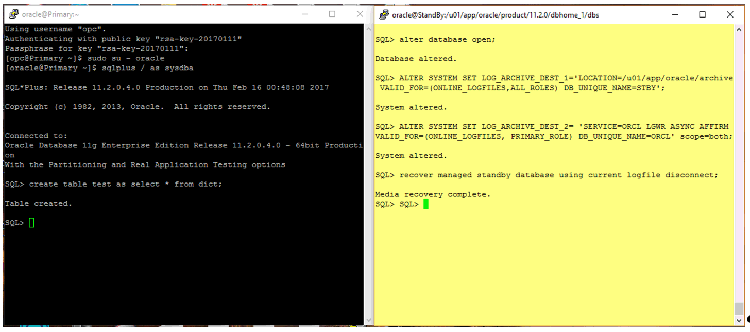
Figure 25. Opening the standby database and starting the recovery
Manually Fail Over to the Standby Database Without Flashback Technology Enabled
Failover is the process of activating the standby database in case the production (primary) database is deformed so as to minimize the risk of data loss. It is not reversible. When the failover process is enabled, the standby database is switched to function as the primary database and you would have to re-create the standby database.
In a worst-case situation when the Data Guard primary database is not available for production, you can activate the standby database to be the primary production database by performing the following steps.
- From the secondary database, run the following SQL statements:
recover managed standby database cancel;
recover managed standby database finish;
alter database activate standby database;
startup force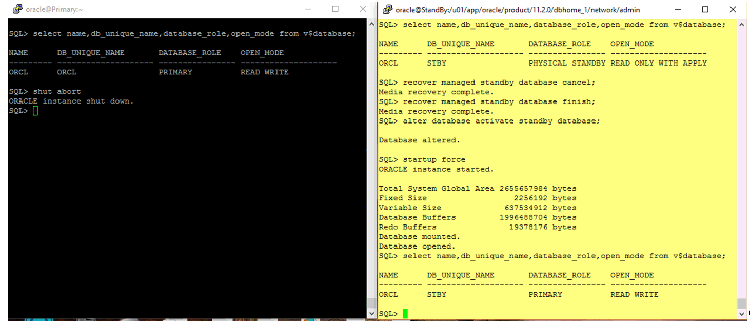
Figure 26. Activating the standby database
- Because we don’t have flashback technology enabled on both sides, manually re-create the old primary database as the physical standby database from the scratch.
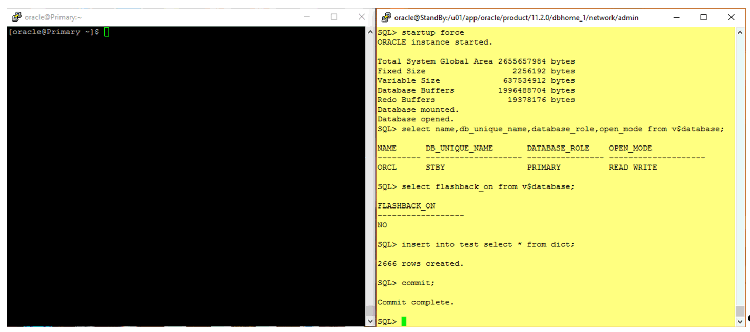
Figure 27. Manually re-creating the old primary database
- Start the old primary database in the “nomount” state. Then reinstate it by running the Oracle RMAN
duplicatecommand from the secondary machine:duplicate target database for standby from active database nofilenamecheck;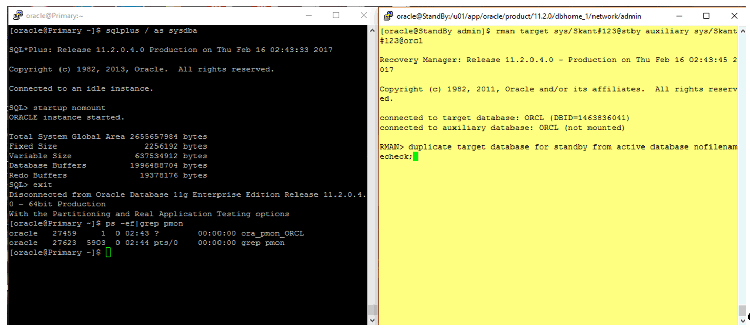
Figure 28. Starting the old primary database and reinstating it
After some time, the old primary database is re-created as the standby database and it is running in the mounted state.
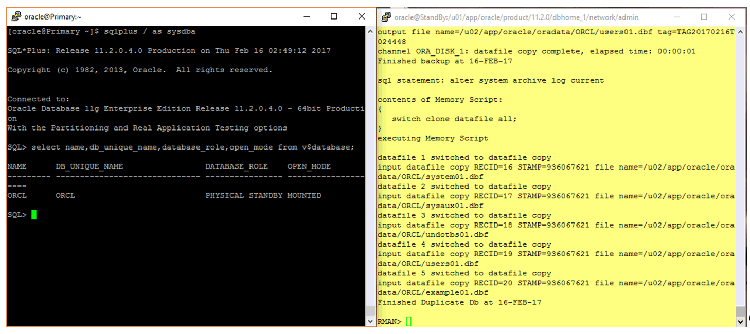
Figure 29. Old primary database running in the mounted state
- Now, open the standby database in read-only mode and start the recovery. Also verify that the physical database is functional.On the primary:
SQL>  alter database open read only;

SQL> recover managed standby database using current logfile disconnect;

SQL> Select count(*) from test;

  COUNT(*)
----------
         0

SQL> select name,db_unique_name,database_role,open_mode from v$database;


NAME      DB_UNIQUE_NAME         DATABASE_ROLE      OPEN_MODE

--------- ------------------------------ ---------------- --------------------

ORCL      ORCL              PHYSICAL STANDBY      READ ONLY WITH APPLY
On the standby:
SQL> Select count(*) from test;

  COUNT(*)
----------
      2666

SQL> delete from test;

2666 rows deleted.

SQL> commit;

Commit complete.

SQL> Select count(*) from test;

  COUNT(*)
----------
         0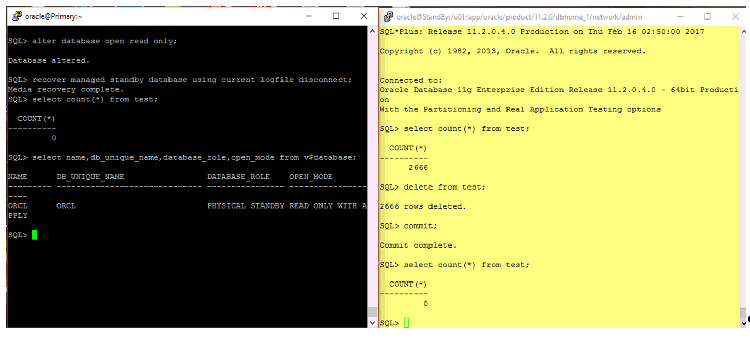
Figure 30. Opening the standby database and starting the recovery
Use Flashback Technology to Reinstate a Standby Database After a Failover with the Data Guard Broker
Hardware crashes have become very common these days. That’s why creating a disaster recovery (DR) configuration for Data Guard is very useful for every database, regardless of its size. But the size of the database defines the tool a DBA can use to re-create the primary database and set up the DR configuration.
If database is quite small, doing a simple “cold copy” using the Oracle RMAN duplicate command is good enough. However, in the case of huge data warehouses or data marts, doing that takes too long. Hence, it is recommended to reinstate standby databases by using the Oracle Flashback Database capability of Oracle Database.
- On the primary machine, mount the database, configure flashback retention, start the Oracle Flashback Database capability, and open the database by running the following statements:
SHUTDOWN IMMEDIATE; STARTUP MOUNT; ALTER SYSTEM SET DB_RECOVERY_FILE_DEST_SIZE=2g scope=both; ALTER SYSTEM SET DB_RECOVERY_FILE_DEST='/u01/app/' scope=both; ALTER SYSTEM SET DB_FLASHBACK_RETENTION_TARGET=240; ALTER DATABASE FLASHBACK ON; ALTER DATABASE OPEN; - On the standby machine, cancel the recovery, mount the database, configure flashback retention, start the Oracle Flashback Database capability, open the database in read-only mode, and start the recovery process by running the following statements:
ALTER DATABASE RECOVER MANAGED STANDBY DATABASE CANCEL;
STARTUP FORCE MOUNT;
alter system set DB_RECOVERY_FILE_DEST_SIZE=2g scope=both;
alter system set db_recovery_file_dest='/u01/app/' scope=both;
ALTER SYSTEM SET DB_FLASHBACK_RETENTION_TARGET=240;
ALTER SYSTEM FLASHBACK ON;
ALTER DATABASE OPEN READ ONLY;
recover managed standby database using current logfile disconnect from session;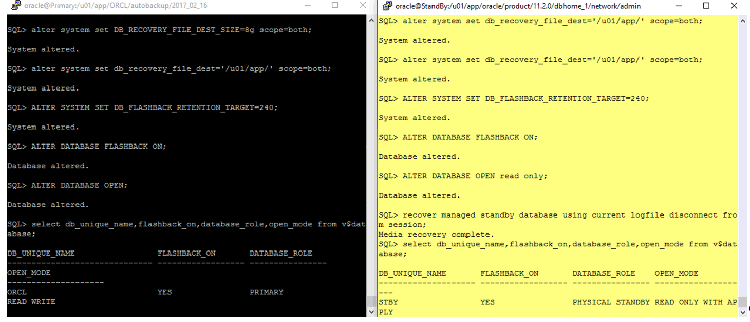
Figure 31. Results of starting the flashback technology on both machines
Next, we will configure the Data Guard broker.
Here are the primary and standby database server details:
Primary server: Primary.compute-aeetisalat78358.oraclecloud.internal
Database: ORCLStandby server: StandBy-1.compute-aeetisalat78358.oraclecloud.internal
Database: STBY1 - On both the primary and the standby database server, start the Data Guard broker process:a. Enable the broker process by setting the value of the parameter
DG_BROKER_STARTtoTRUE.ALTER SYSTEM SET DG_BROKER_START=TRUE SCOPE=BOTH;b. Ensure that the
listener.orafile on both servers has a static entry for the DGMGRL command-line interface. (This was added earlier in step 9.)c. On the primary server, create the Data Guard broker configuration by running the statements:
DGMGRL> CREATE CONFIGURATION 'Cloud DG' as PRIMARY DATABASE IS'ORCL' CONNECT
IDENTIFIER IS 'ORCL';
Configuration "CloudDG" created with primary database "ORCL"
DGMGRL> show CONFIGURATION
Configuration - CloudDG

        Protection Mode :MaxPerformance
        Members:
        ORCL - Primary database

Fast-Start Failover:DISABLED

Configuration Status:
DISABLED
d. Add the standby database to the configuration by running the following statements:
DGMGRL> ADD DATABASE 'STBY' as CONNECT IDENTIFIER IS 'STBY';
Database "STBY" added

DGMGRL> show CONFIGURATION
Configuration - CloudDG

Protection Mode :MaxPerformance
Databases:
     ORCL - Primary database
     STBY - Physical standby database

Fast-Start Failover:DISABLED

Configuration Status:
DISABLED
e. Enable the configuration by running the following statements:
DGMGRL> enable CONFIGURATION
Enabled.
DGMGRL> show CONFIGURATION

Configuration - CloudDG

 Protection Mode: MaxPerformance
 Databases:
  ORCL - Primary database
  STBY - Physical standby database

Fast-Start Failover: DISABLED

Configuration Status:
SUCCESS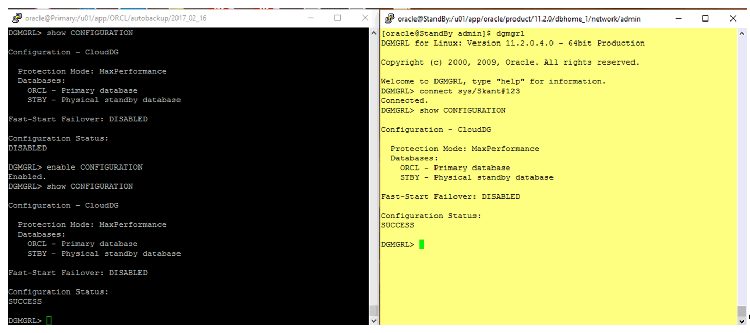
Figure 32. Results of enabling the broker
- Now, to continue this simulation, crash the primary database.
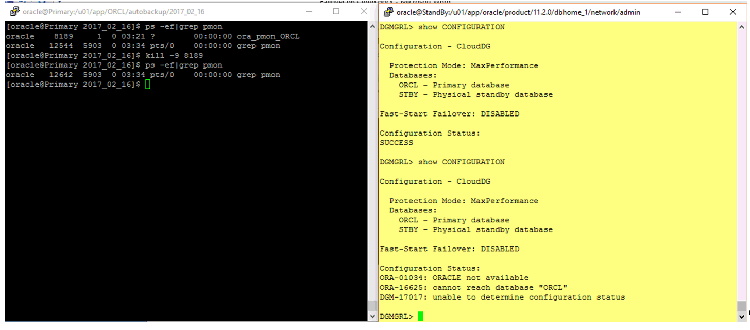
Figure 33. State of the primary database after is it crashed
- Now, perform a failover to the standby server by running the following command:
DGMGRL> failover to 'STBY'
Performing failover NOW, please wait…
Failover succeeded, new primary is "STBY"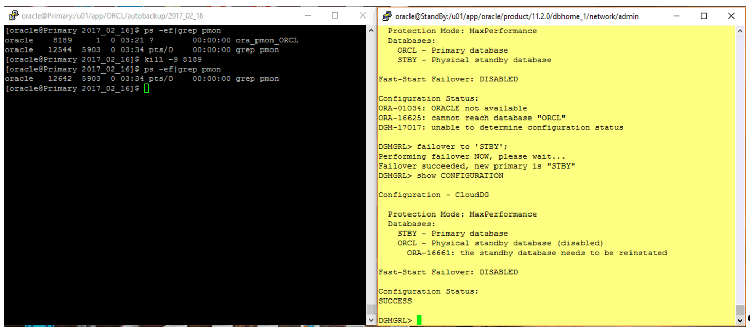
Figure 34. Performing a failover
Note: Now the standby database becomes the primary database.
- Reinstate the database.Because we have Oracle Flashback Database already configured, you can use the following command to reinstate database without restoring the backup:
DGMGRL> reinstate database 'ORCL';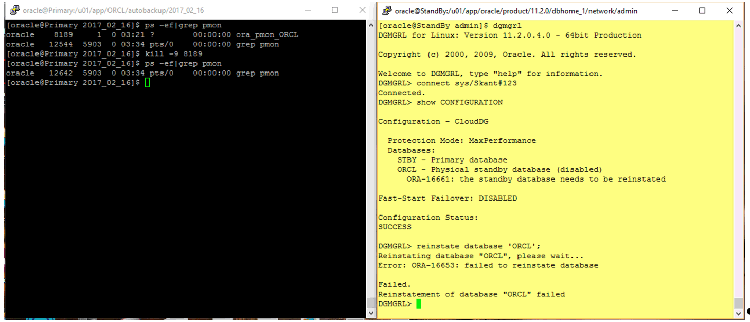
Figure 35. Reinstating the database
Failing which we would have been required to configure flashback database in order to reinstate the database automatically. As Figure 35 shows, the reinstate task failed because flashback is not configured to reinstate automatically across the
Reinstate Database <DB name>command. - Now we’ll move back to the old configuration. Perform a switchover operation, as shown in Figure 36.
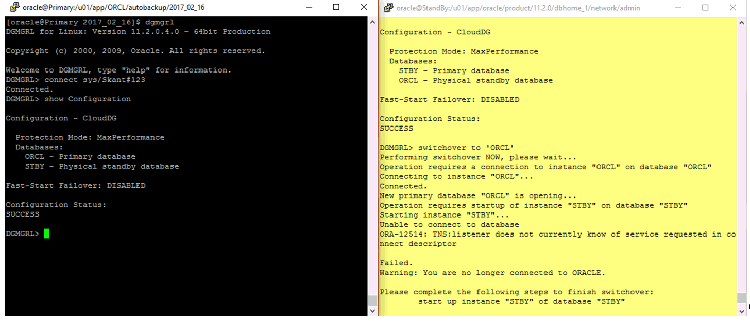
Figure 36. Performing a switchover operation
Conclusion
So now you know that it is very easy to perform a failover over the cloud with and without using Oracle Flashback Database.
We hope this article is useful and we invite you to continue reading our next publications focused on Oracle Cloud.
About the Authors
Joel Pérez is an expert DBA and Oracle ACE Director and an Oracle Certified Master in Oracle Maximum Availability Architecture, Oracle Database cloud administration, and Oracle Database 11g and 12c. He has over 17 years of real-world experience with Oracle technology and specializes in the design and implementation of solutions for the cloud, high availability (HA), disaster recovery, upgrades, replication, and most areas related to Oracle Database. Currently, he works as chief technologist and architect for cloud technologies, Oracle Maximum Availability Architecture, and HA at Yunhe Enmo (Beijing) Technology Co., Ltd. in Beijing, China.
Skant Gupta is an Oracle Certified Cloud Professional in Oracle Database 12c, an Oracle Certified Expert in Oracle Real Application Clusters (Oracle RAC) in Oracle Database 11g, and an Oracle Certified Professional in Oracle Database 10g, 11g, and 12c. He worked at Vodafone Technology in the UK and formerly worked as a senior DBA at Etisalat in Dubai. He has 10+ years of experience with various Oracle technologies, focusing mainly on cloud, database, and high availability solutions, Oracle WebLogic Suite, and Oracle GoldenGate. He has presented at several Oracle user groups worldwide, most recently in the US, the United Arab Emirates, and India. He is now a key member of our Oracle team at Blue Crystal Solutions.
Reference: Gupta, S. and Pérez, J. (2018). How to Fail Over and Reinstate Oracle Database on Oracle Cloud. [online].


